Creating Public/Private Keys on Windows for Launching AWS EC2 Linux Servers
This is a beginner-friendly tutorial. The article shows how to generate public/private keys to set up an Linux-AWS server and how to use them to connect to the server's shell.Table of Contents
- Introduction
- Prerequisites
- Create and Uploading an SSH-Key
- Launch an EC2 Instance That Uses Your Public/Private Key Pair
- Logging Into Your EC2 Instance
- We Did It, Yay!
- Why We Use ZOC Terminal Instead of PuTTY
Introduction
This article will show how to create a public-private key pair and set up an Amazon AWS Linux server on EC2 that lets you login to the shell using these.
This tutorial will provide step by step instructions on how to set up a Linux server on EC2 using public/private keys. You can do this without cost with the free AWS tiers and the free trial of ZOC Terminal.
Prerequisites
The following requisites are required to perform this task (they will briefly be covered below):
- Amazon AWS account
- ZOC-Terminal (available for Windows or macOS)
Amazon AWS Account
Obviously you will need an Amazon AWS account. If you don't have one, here is a good tutorial (Depending on your Risk profile, you can skip the MFA part but you should definitely set up the cost alerts).
ZOC Terminal
Setting up a Linux server will always require some work on the Linux shell. This article will explain basic tasks with ZOC Terminal. You can download ZOC Terminal here. There will be a free trial with all features enabled, no ads for 30 days of actual use (i.e. if you use the program only once a week, the trial will last you for half a year).
To install ZOC Terminal, download it here. Installation is straightforward: During installation just go with the preselected values. If asked about your intended use, choose Access to Linux systems via SSH. Should you later decide that you do not like it, it will offer a quick and clean uninstall.
Create and Uploading an SSH-Key
Create a RSA Key Pair
First you need to create a Public/Private key pair on your computer:
- Start ZOC Terminal
- Open the Tools-menu
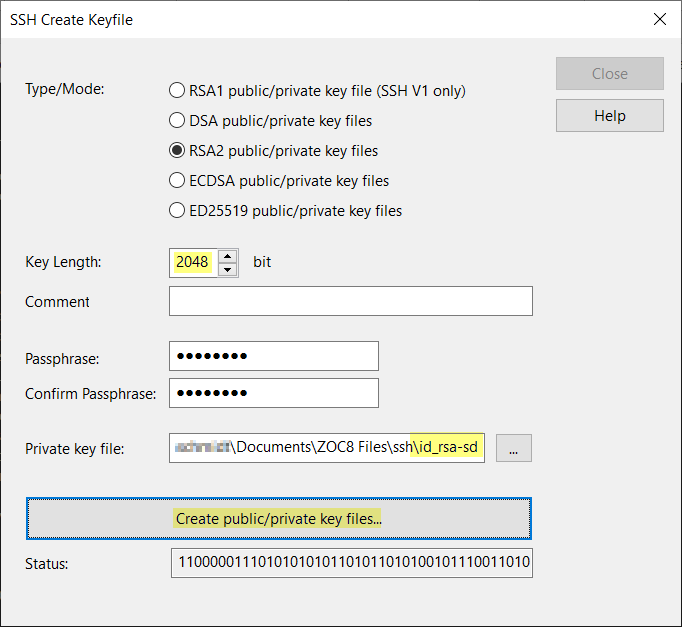
- Choose Public/Private Key Generator
- Select RSA2, enter
2048for the key length and change the name toid_rsa-sd - Choose a passphrase (this will be your password for using the key)

- Click Create public/private key files
- Click Close
Upload the Public-Key to the AWS Console
Still in ZOC Terminal:
- From the Tools-menu choose Copy SSH Public-Key to Clipboard
- Choose the id_rsa-sd.pub file (not the one without the .pub file type) and click Open
- Click Close on the message that shows the key
In your Web-Browser:
- Logon to AWS, select the region of your choice (e.g. N.Virginia) and go to EC2 (e.g. by typing EC2 in the search bar).
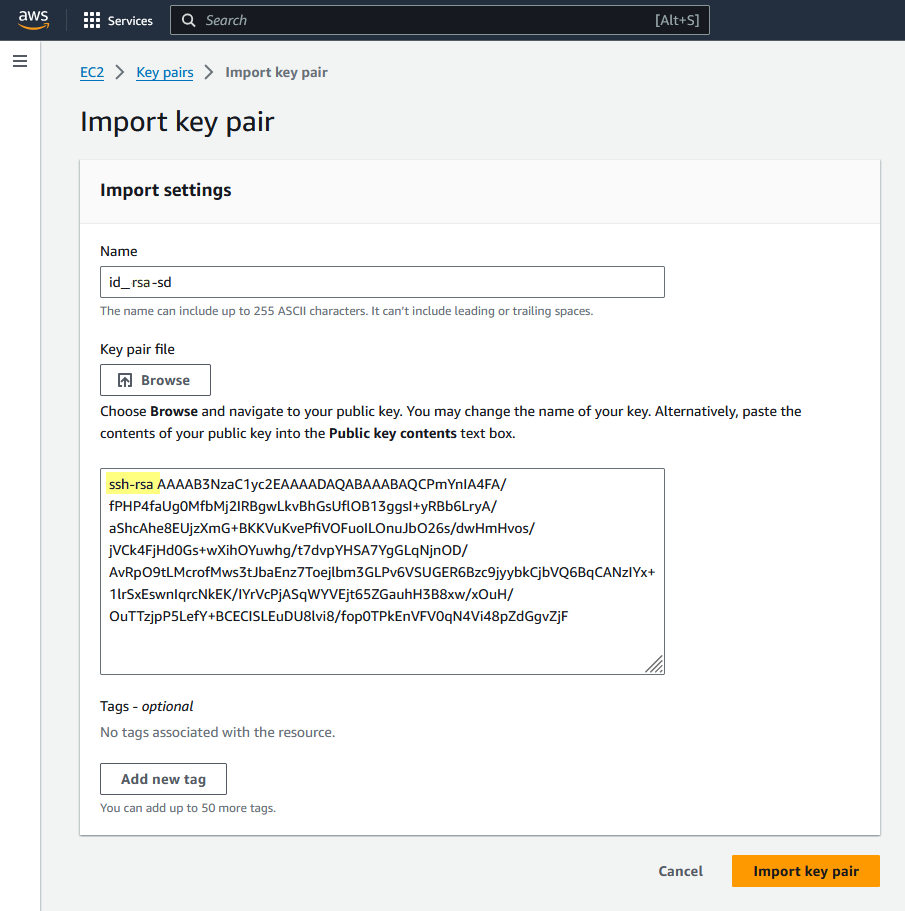
- On the left sidebar scroll down to Network & Security, choose Key Pairs and select Actions → Import Key Pair.
- Enter
id_rsa-sdas the name of the key and right-click → Paste in the text area for the Public key contents. (this should give you text beginning withssh-rsaand a few lines of MIME text, otherwise copy the key again via ZOC's Tools menu)

- Click Import Key Pair.
Note: You only need to complete these steps once. After that, you can use this key for all future EC2 instances you create.
Launch an EC2 Instance That Uses Your Public/Private Key Pair
Logon to AWS, select the N.Virginia region and go to EC2 (e.g. by typing EC2 in the search bar). On the left sidebar choose Instances and click Launch Instances.
You will be greeted by an intimidating amount of options, but only a few need to actually be set.
- Name: Enter a name, e.g.
Test-Instance. - Application and OS Images: Scroll through the Quick Start list and choose Debian (Ubuntu will also work).
- Instance Type: Select
t2.microas instance type or any of the other free tier egligble types. - Key-Pair: Select the
id_rsa-sdkey pair (this is the key you imported in the previous step). - Network Settings: Click Edit
- Enable the Auto-assign public IP option (if not enabled). - Configure Storage: Select
12GiB andgp2.
Finally click on the orange Launch Instance button.
The system will try to create your instance and after a few seconds you should see a green Success message.
Logging Into Your EC2 Instance
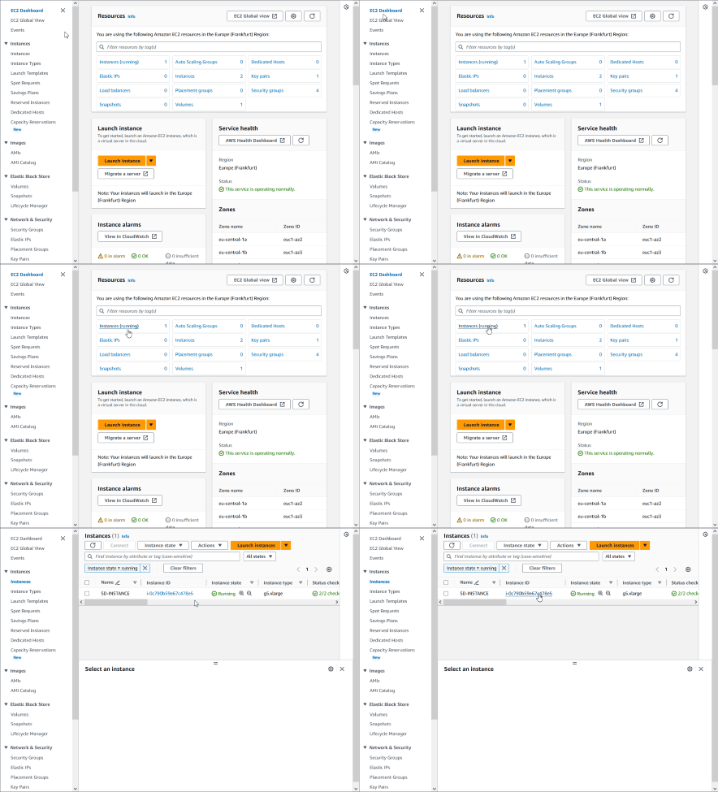
Use the left sidebar to switch to EC2 Instances. There you should see one instance with instance state Pending or Running.
- Click on the Instance ID and in the next page copy the public IPv4 address.
- Start ZOC and select File-menu → Quick-Connect (or use this window if it automatically opens after starting ZOC)
- Enter or select the following values:
• Connect-To: (paste your instance's ip address)
• Connection-Type: Secure Shell
• Emulation: xterm
• Username:admin(Note: if you instantiated Ubunutu instead of Debian, the username will beubuntu)
• then click on Select Key... and choose theid_rsa-sdfile (not theid_rsa-sd.pubfile) - Click Connect

We Did It, Yay!
After a moment should see a connection screen that shows the connection proceeding and eventually you will see the beloved (or dreaded) $-prompt.
Now you are logged into the Linux using your public/private key pair.
If you liked how easy this was, please now allow us a little 60-seconds sales pitch for ZOC Terminal.
Why We Use ZOC Terminal Instead of PuTTY
You can perform the above tasks with a free SSH client like PuTTY as well.
However, while PuTTY is a reasonable choice for to access Linux shells every now and then, ZOC Terminal is designed for ease of use and effectiveness day in and day out. It offers elegant features that save you a lot time when performing routine tasks.
For example, as you saw, creating the key-pair and obtaining the public key takes only a matter of seconds (about 10 mouse clicks).
Connecting to your EC2 instance through the Quick Connect window is also very easy. If you log off and then realize you forgot something and want to connect again, you can simply press Alt+R in the disconnected tab. Alternatively, go to the Quick Connection window again and click Connect, so you are reconnected with just two mouse clicks.
For file uploads, you can upload files to your server merely by dragging them from the desktop into the ZOC terminal area.
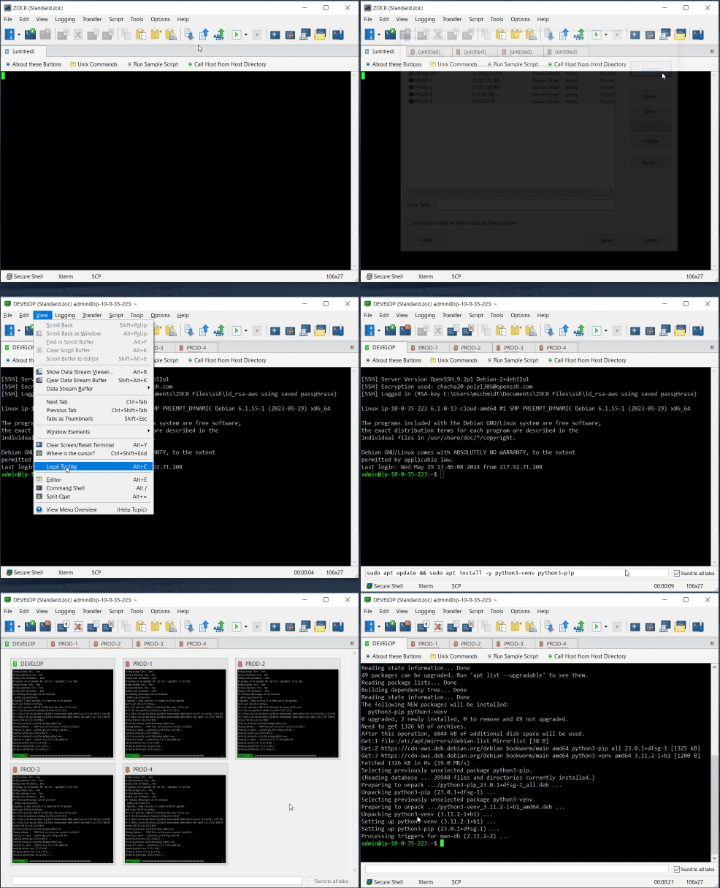
If you are building multiple instances, you can save them from the Quick Connection window to the Host Directory. From there, you can even connect to multiple instances at once (each will then open in a separate tab).
Assume you need to update or install a package on five servers: Open the Host Directory,
select the servers using shift+Mouseclick and click Connect. Then press Alt+C to open
the Local Typing window. Type your command (e.g., sudo apt update && sudo apt install -y build-essential ),
click Send to all tabs, press Enter and you have easily performed this task in under a minute.
Press Shift+Esc to watch the parallel output in the Thumbnails overview. Below is a 60-second
video which shows how it works and which also shows a few other functions because after
updating 5 servers, within those 60 seconds there was even time left to show file uploads
and tab colors ;-).
These are just a few examples that demonstrate how using a professional ssh client like ZOC can save valuable time compared to free tools like PuTTY (which admittedly does cover the essentials quite well).
Conclusion: Performing tasks with ease saves time and it also is more fun!

