How to Create a Stable-Diffusion Automatic-1111 Server on AWS
This article shows how to set up and configure an AWS server to run stable diffusion via Automatic-1111.Table of Contents
- Introduction
- Prerequisites
- Creating and Uploading an SSH-Key
- Launching an EC2 Instance
- Logging Into Your EC2 Instance
- Basic Preparation
- Installing NVIDIA Drivers
- Installing Python 3.16.5
- Installing Automatic-1111
- Yay!
- What Next?
Introduction
This article will show how to set up Stable Diffusion with the Automatic-1111 user interface on an Amazon AWS server.
TLDR; This guide explains how to set up an AWS-Linux server with CUDA drivers from the beginning. Depending on your familiarity, it may take between 30 minutes (for those with basic AWS/Linux experience) to half a day (for complete beginners). Once you've completed the process once, subsequent setups can be done much faster, typically between 5 to 15 minutes. This is because certain steps are only needed once, and you can even create a template of your server for future launches.
Prerequisites
These instructions are not for the faint of heart and we assume that you have some basic knowledge about Amazon AWS and Linux. It is possible to start without this knowledge, but in that case expect this to turn into a fully-day journey with a lot of detours (on the bright side, you will learn a lot of interesting stuff).
If you have some Linux and AWS experience, this will take about one or two hours. Since many steps need to be performed only once, when you are familiar with this process, you can set up such a server from scratch within 10-20 minutes (most of which will be waiting time, especially one step where the server runs NVIDIA drivers install) and at the end of the article, we will suggest steps that will let you do it even quicker.
The following requisites are required to perform this task (they will briefly be covered below):
- Amazon AWS account
- Basic knowledge about AWS EC2
- AWS Service Quotas for G-instances
- Shell scripts associated with these instructions (obtained from github)
- ZOC Terminal (available for Windows or macOS) or a similar SSH client
- Basic knowledge of how to use a Linux shell
Amazon AWS Account
Obviously you will need an Amazon AWS account. If you don't have one, here is a good tutorial (Depending on your Risk profile, you can skip the MFA part but you should definitely set up the cost alerts; also we will cover the SSH part separately, so yo can skip the part near the end where he does the key creation and ssh connect).
Basic knowledge on how to set up an Amazon AWS EC2-instance
See the video above.
AWS Service Quotas
In order to create machine learning instances, you will need permission from Amazon
to instantiate certain types. To to this, type Service Quotas in the AWS search
bar, then type EC2 in the Manage Quotas field and select
Amazon Elastic Compute Clound (Amazon EC2) and click
View Quotas. Then click Running On-Demand G and VT instances. Then click
Request Increase at Account Level and in the Increase quota value select
4 or 8 (this will be 4 or 8 CPUs and since one g4dn.xlarge or one g5.xlarge
instance has 4 CPUs this will allow you to instantiate one or two of those).
The g4dn-instances use NVIDIA T4 GPUs with 16GB Video RAM and are a good starting point to get your feet wet at a price of about $0.60/hr for a g4dn.xlarge.
The more powerful g5-instances use NVIDIA A10G Tensor GPUs with 24GB GPU Memory and start at $1.25/hr. They are available at the N.Virigina and Ohio regions.
Note: If Amazon support messages you back about the increase of quotas, describe what yo want to do with these machines (explore Automatic-1111) and tell them that you are aware that these machines are not free and that you clearly understand that leaving an instance running will incur hourly cost.
Shell Scripts for this Article
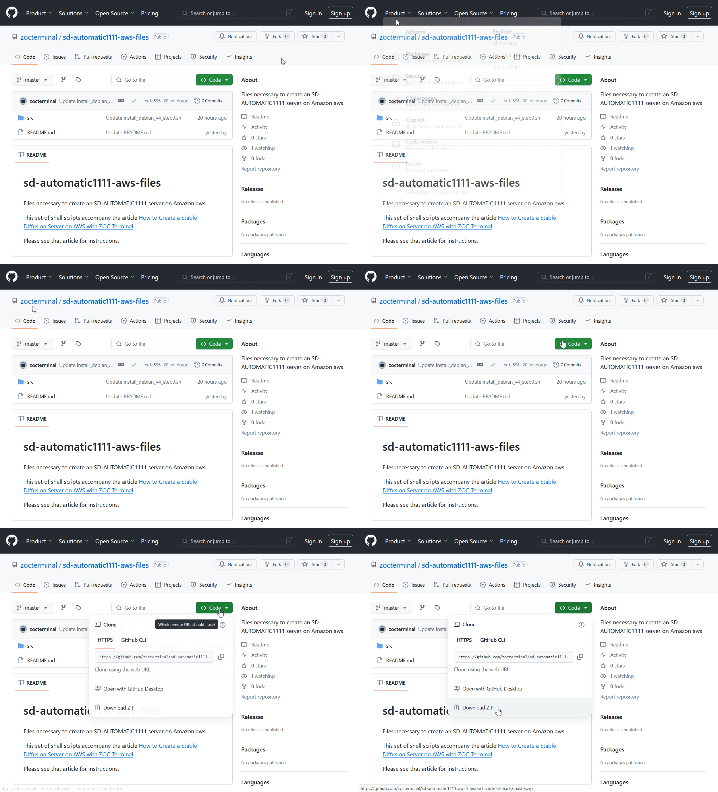
Download copy of the shell scripts that come with this article (either clone the repository to your computer or click on Code and download the ZIP file).
ZOC Terminal or a different SSH Client
Setting up the server will require some work on the Linux shell. This article will explain basic tasks with ZOC Terminal (you can download ZOC Terminal here, there will be a free 30 days trial with all features enabled and no ads), but if you know what you're doing, you can use a different SSH client like Putty or Windows command line OpenSSH.
If you are going for ZOC Terminal, download it here. Installation is straightforward: During installation just go with the preselected values. If asked about your intended use, choose Access to Linux systems via SSH. Should you later decide that you do not like it, it will offer a quick and clean uninstall.
Creating and Uploading an SSH-Key
Create a RSA Key Pair
- Start ZOC Terminal
- Open the Tools-menu
- Choose Public/Private Key Generator
- Select RSA2, enter
2048for the key length and change the name toid_rsa-sd - Choose a passphrase (this will be your password for using the key)
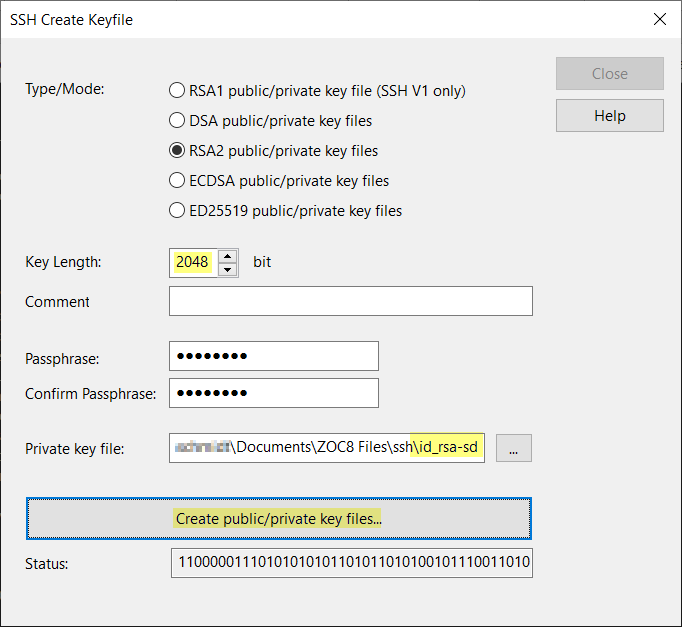
- Click Create public/private key files
- Click Close
Upload the Public-Key to AWS
Still in ZOC Terminal:
- From the Tools-menu choose Copy SSH Public-Key to Clipboard
- Choose the id_rsa-sd.pub file (not the one without the .pub file type) and click Open
- Click Close on the message that shows the key
In your Web-Browser:
- Logon to AWS, select the N.Virginia region and go to EC2 (e.g. by typing EC2 in the search bar).
- On the left sidebar scroll down to Network & Security, choose Key Pairs and select Actions → Import Key Pair.
- Enter
id_rsa-sdas the name of the key and right-click → Paste in the text area for the Public key contents. (this should give you text beginning withssh-rsaand a few lines of MIME text, otherwise copy the key again via ZOC's Tools menu)
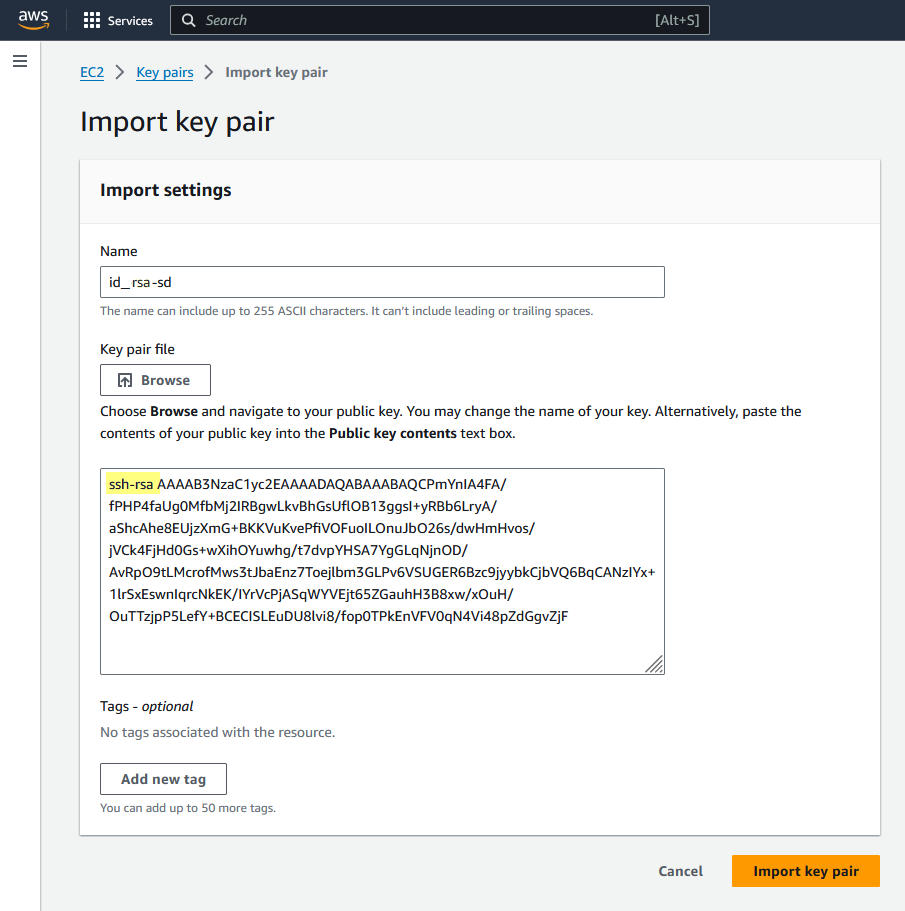
- Click Import Key Pair.
Note: You only need to complete these steps once. After that, you can use this key for all future EC2 instances you create.
Launching an EC2 Instance
Logon to AWS, select the N.Virginia region and go to EC2 (e.g. by typing EC2 in the search bar). On the left sidebar choose Instances and click Launch Instances.
You will be greeted by an intimidating amount of options, but only a few need to actually be set.
- Name: Enter a name, e.g.
SD-Instance. - Application and OS Images: Click Browse more AMIs, in the search bar enter
Debian 11, switch to the Amazon Marketplace AMI section and select the Debian 11 (by Debian) image that has the Debian logo (red spiral), click Select and then Subscribe now (Note: It is important that you use a plain Debian 11, because this is one of the few platforms where Automatic-1111 is tested/supported). - Instance Type: Select
g5.xlargeas instance type (Note: if you are you free tier egligible of if you do not yet have the service quotas for the G- and P-class instances, you can also selectt3.microfor now ... this will not allow to actually run SD but you can practise most of the installation steps with this type before you get real with the more expensive g5.xlarge or p3.2xlarge instances). - Key-Pair: Select the
id_rsa-sdkey pair (this is the key you imported in the previous step). - Network Settings: Click Edit
- Enable the Auto-assign public IP option.
- Further down under Inbound Security Group Rules click Add security group rule
- Then choose: Type=Custom TCP, Port=7860, Source-Type=Anywhere, Description=A1111-GUI. - Configure Storage: Select
30GiB and gp2(slower, less expensive) orio1(Note: On your first runs you can use30GiBgp2, which will be less expensive, but once you actually use SD via Automatic-1111 and experience delays when switching between checkpoints, you can provisionio1storage, because this provides faster hard drive access for Automatic-1111 which creates a lot of churn on the drive, especially when switching between models).
Finally click on the orange Launch Instance button.
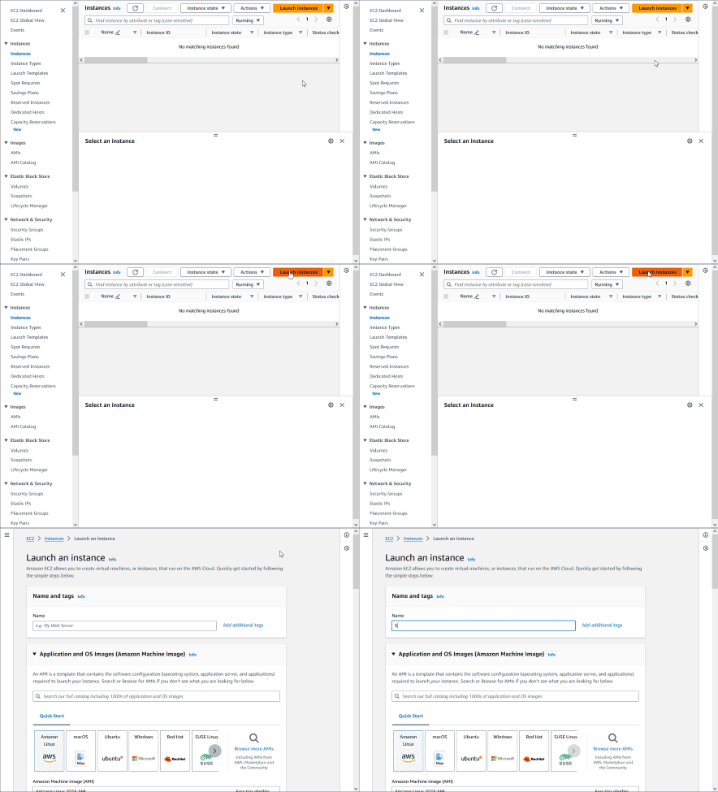
The system will try to create your instance and after a few seconds you should see a green Success message.
Logging Into Your EC2 Instance
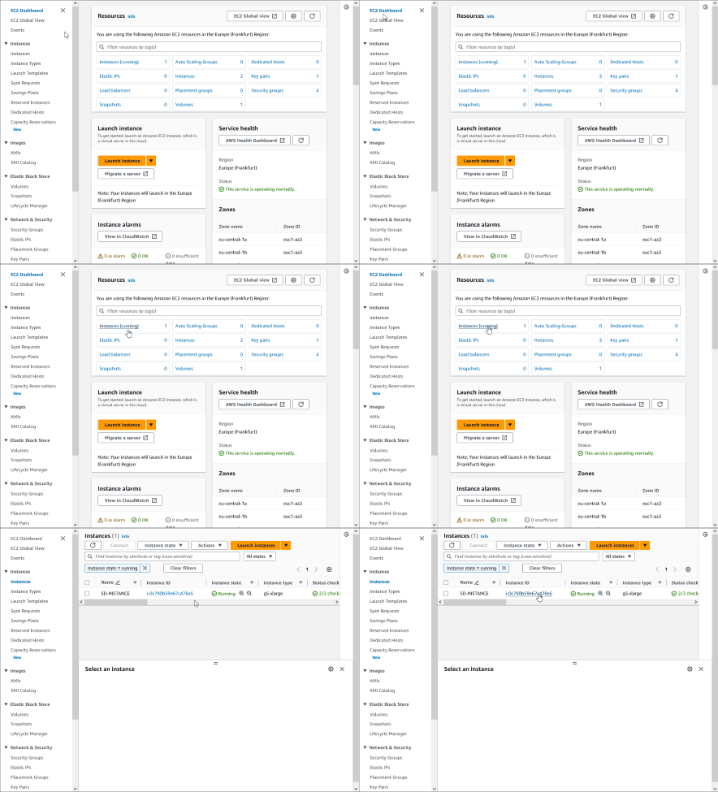
Use the left sidebar to switch to EC2 Instances. There you should see one instance with instance state Pending or Running.
- Click on the Instance ID and in the next page copy the public IPv4 address.
- Start ZOC and select File-menu → Quick-Connect
- Enter or select the following values:
• Connect-To: (paste your instance's ip address)
• Connection-Type: Secure Shell
• Emulation: xterm
• Username:admin
• then click on Select Key... and choose theid_rsa-sdfile (not theid_rsa-sd.pubfile) - Click Connect
After a moment should see a connection screen that shows the connection proceeding and eventually a $-prompt.
Basic Preparation
Now get the shell shell scripts that come with this article
and put them in a folder on your desktop (if you downloaded the ZIP version, unpack it into a folder). Then
pull the *.sh files (go_00..., install_...) from src folder into the terminal area of ZOC Terminal.
You should see an Upload SCP window that transfers the individual files and after a few second you
will be at the $-promt again.
Type ls -l (and press Enter) to verify that the files are there, then type source go_00_dos2unix.sh
(and press Enter). This will install a few basic programs and will finally convert the install... files
via the dos2unix tool.
Now you have a basic Debian-11 with the necessary software to perform the next steps, but before doig that, log off and connect again (in ZOC Terminal press Alt+H to disconnect and then Alt+R to reconnect).
The next step will install a few typical commands and a few more basic programs which will be necessary to
install the NVIDIA drivers and Automatic-1111. Type ./install_debian_v4_step1.sh and let it run until
the $-prompt appears again.
Installing NVIDIA Drivers
Note: If you started with a practise run on a basic AWS instance (not a g5 or p3) skip this step and continue with the Python install.
The download, compilation and installation of the NVIDIA CUDA drivers are done in the next script, step so now run:
$ ./install_debian_v4_step2.sh
This will take a while (3-5 minutes). You can wait for it or you can open another tab (press Alt+R in ZOC Terminal) and launch the next step at the same. Once you launched the python install, come back to here and check that finally you have output like this:
+-----------------------------------------------------------------------------+
| NVIDIA-SMI 525.60.13    Driver Version: 525.60.13    CUDA Version: 12.0     |
|-------------------------------+----------------------+----------------------+
| GPU  Name        Persistence-M| Bus-Id        Disp.A | Volatile Uncorr. ECC |
| Fan  Temp  Perf  Pwr:Usage/Cap|         Memory-Usage | GPU-Util  Compute M. |
|                               |                      |               MIG M. |
|===============================+======================+======================|
If that is the case you can delete the cuda packet and free up 4GiB of your precious disk memory:
$ rm cuda_12*
Installing Python 3.16.5
Automatic-1111 is rather picky about which version of Python it runs on, so we run step 3, which will install Python 3.16.5:
$ ./install_debian_v4_step3.sh
This will take about 5-7 minutes and should finally provide you with this message:
The line below should now say 'Python 3.10.6':
Python 3.10.6
Installing Automatic-1111
In order to install Automatic-1111 and some useful scripts run step 4:
$ ./install_debian_v4_step4.sh
More text will run by until it finally stops with a message saying
Model loaded in x.xs (calculate.....
This means that Automatic-1111 is already running and if this was your own computer at home you could now access it through the local web browser.
Since this is a computer on the AWS cloud, press Ctrl+C and then enter the following command to run the webui and have it listen on port 7860 of your instance's IP address:
$ ./run.sh
When you see the Model loaded ... message again, note the IP address from your
instance (e.g. right-click the tab and select Copy Tab Title to Clipboard in ZOC Terminal),
start a web browser on your computer and in the web browser's address field enter:
http://xx.xx.xx.xx:7860 (where xx.xx.xx.xx is the actual IP address of your instance,
also make sure you type http and not https).
You should now be greeted by the Automatic-1111 page.
Yay!
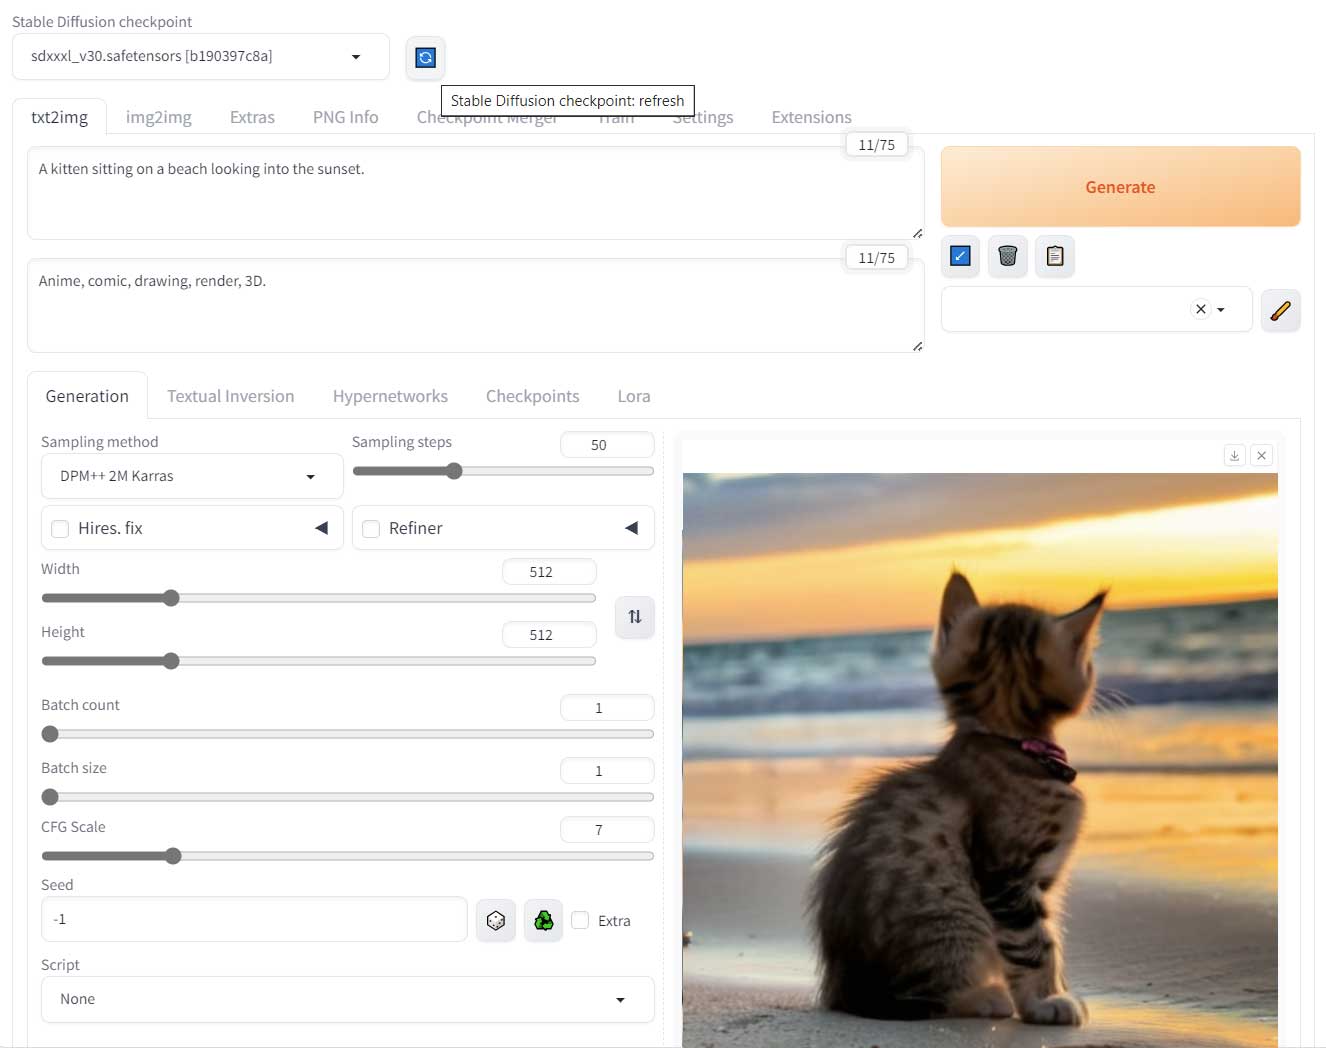
You are now ready to make your own AI generated images (see the image below with the entered text and selected parameters).
Automatic-1111 is a complex piece of software in itself and explaining it is go beyond the scope of this article, but YouTube will have you covered on this front.
Also, see the steps below for ideas about how to streamline this process.
What Next?
Don't Forget to Terminate Your Instance
Once you are finished make you go to Instances → Instance State → Terminate Instance or the instance will continue to incur hourly costs even if you did shut it down.
Download Model Files to Your Instance
Sooner or later you will come across the necessity to download a file from
huggingface or civitai. In the admin's home folder you will find two shell
scripts that show how that is done: get-essentials.sh and get-civitai-link.sh.
You can run ./get-essentials.sh to download the stable-diffusion-xl models
and two VAE files which you will most likely need in the future and you you can
run ./get-civitai-link.sh <some civitai link> to download files from civitai
(you need to edit the shell script first and add your API token).
Create a Launch Template
Amazon lets you put the parameters from the big Launch Instances page into a template so you won't have to enter them every time.
To do this, when the instance is running, go to the AWS EC2 Instances page, click the instance
and choose Actions → Image and Templates → Create template from instance.
Then enter a name for your template, e.g. debian-11-for-sd and click Create launch template.
In the next page make the same choices as above when launching the actual instance.
After that you can launch a new instance with the same settings from the left sidebar Instances → Launch Templates → Actions → Launch Image from Template
Create an AMI Image
Using a launch template will relieve you of the task of setting the options for the instance every time, but it will still create an instance that starts with plain Debian 11.
However, you can save an image of the system with all your installations steps completed under Instances → Actions → Image and Templates → Create Image.
This will let you create your own AMI and when you launch an instance based on that AMI (instead of the Debian 11 Marketplace AMI), it will come up with all your configurations and installations.
However, as everything with AWS, this will come at the cost (see AWS EBS Pricing) for storing an AMI and the associated snapshot (left sidebar Images → AMI and Elastic Block Storage → Snapshot).
If you combine this with a Launch Template (see above), you can fire up a fully configured machine within 2 minutes.
Use AWS P-Instances
AWS offers the P-instance type that is more powerful than the G5. Not surprisingly it is also more expensive. You will have to request quotas and the type to start with will be P3.2xlarge.
Use AWS Spot Instances
Amazon offers a special type of instances, which are available at a discount if AWS has a lot of spare capacity. The drawback is, that AWS can terminate your instance at any time if it needs the capacity for someone else.
The discounts are as high as 50% though, e.g. compare prices for a g5.xlarge instance AWS Spot Pricing vs. AWS On Demand Pricing in N. Virginia.
Thus spot instances are worth trying for experiments and for situations where you can afford if an instance occasionally disappears, especially if you run your instances outside U.S. peak business hours.
You will have to request quotas for these: All G and VT Spot Instance Requests.
To instantiate an instance as a spot-instance click on Advanced Details before launching the instance, then scroll down to Purchasing option and select Spot instances and set the request type as One-time-request.

